
Morning everyone!
I'd like to share something a little different today...
Some techniques that are near and dear to my heart, and that hopefully might help someone.
I often get emails asking how I get my cards to look so textured, and more specifically, how to work with layering + textured products in paper crafting. While there really is no one single answer, and I am certainly not the expert on this in any way, there definitely are some go-to's that I turn to time and time again, and I'd love to share them with you here today.
I hope it will inspire someone to just go ahead and start working with more of these products and to play with the art of layering. I know that personally, I can't get enough of this style, and no card feels complete to me without a little bit of that something-something that pops!
So, here we go!

I created these two specifically with extra texture in mind.
First up, I'd like to share with you this card, and my top ten ways to create texture on any paper project.
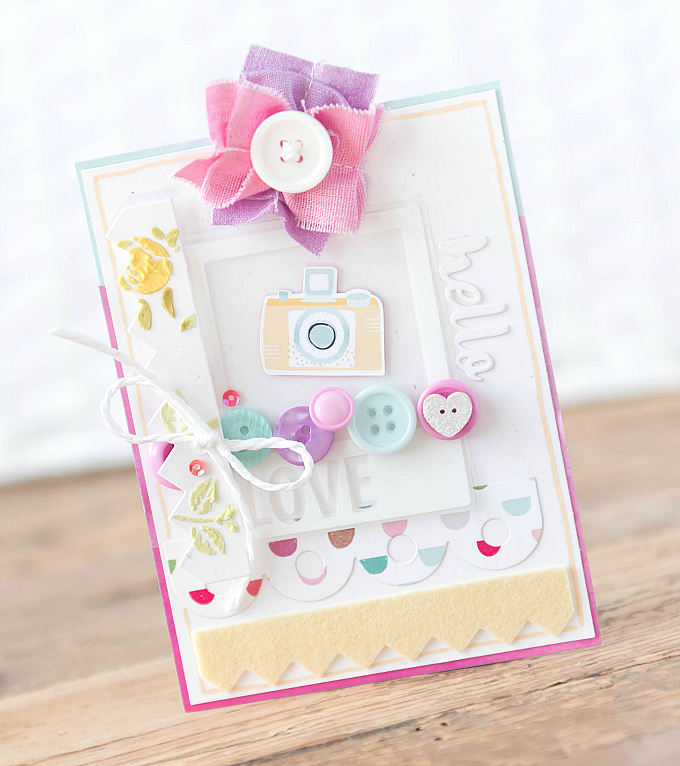
When I think of texture, I think, layers, dimension, and depth. But I used to struggle with how exactly to get that look to work on a card, without being overpowering. Don't get me wrong - I've seen STUNNING paper crafts with a ton of texture that are gloriously beautiful, and I've worked with all levels of layering over the years, but I'm finding that lately, I just prefer to create cards that I can still easily mail, and a cleaner look. So my goal is to texturize, but keep it simple.
To show you a visual of this concept, I've combined some of my go-to methods in the card above. While I likely wouldn't use all of these together (present card excluded), you'll often find that I combine 3-4 of these on any given card.
FAVORITE 10 WAYS TO CREATE CARDS WITH TEXTURE
FAVORITE 10 WAYS TO CREATE CARDS WITH TEXTURE
1. White on White or Color on Color
A subtle way to add texture is to die cut, stamp, emboss or add a white element to a white base, such as the little 'hello' die. This works with any other color as well and actually with other materials than just dies/stamps/embossing (such as the little acrylic polaroid above). It creates a beautiful texture without introducing additional colors, which can go a long way in achieving a clean, minimalist look.
This technique also works wonders when creating backgrounds, especially in a repetitive fashion.
This technique also works wonders when creating backgrounds, especially in a repetitive fashion.
2. Balance with Embellishments
This one is pretty basic and simple, but so important to me when trying to create a pleasing design to the eye. I find that typically when I'm using ribbon, bows or any other embellishment on a card, I like to balance it out with a similar level of texture somewhere else on the card. In the card above, the bow at the top is balanced by the row of buttons below. Note that both embellishments are similar in color, and also in chunkyness. This also makes the card easier to mail, because the texture is evenly distributed :)
3. Texture Paste
When I don't want to add a ton of bulk to my designs, this is hands down my FAVORITE! I love how subtle, yet perfectly pronounced the embossing/texture paste looks. Here is some more info on this method from a previous post.
4. String
As simple as this might sound, string actually adds quite a bit of depth, while still remaining delicate and keeping the card rather flat. I love paper string and how easy it is to fold and twist, and it also comes in super handy when adding a "stitch" to buttons :)
5. Sequins
Another favorite for me. It's such an easy way to add texture without a ton of bulkyness. And the added sparkle can't be beat! Tip: I loooove using these glue pens for adhering sequins because of their targeted application and because they dispense enough glue to actually hold the sequins in place.
6. Felt
Felt is such a fun product to use. It can be colored, cut, folded, stitched, layered, and it adds this beautifully warm, soft feeling to any card! I love just adding bits and pieces of it in interesting shapes, or strips, or using tiny little dies to diecut small shapes - or what I like to call 'felt-fetti'. Here I just added a pinked border, and it instantly anchored the card!
7. Buttons
Buttons are so great. I love them. I really do. I love that they are plain and can be very versatile if needed. I love that with a little bit of glitter they can be completely transformed. I love that they work for masculine, feminine and every in-between theme of cards. And I love that they're affordable and never go out of style. My fave way to use buttons? Atop a bow, or in a row :)
8. Patterned Paper
Yes! Simple paper can actually add texture! If it is layered in a specific way it can do wonders to create dimension. I love adding it in an overlapping fashion, which always gives me a more textured look than simply spacing it apart. So go ahead, before gluing down your paper, try tucking in another pattern and see the instant depth it adds!
9. Fabric
Fabric is similar to felt, as it has this incredibly warm quality to it. Whenever I can, I use fabric for bows, backgrounds, or for diecut elements.
10. Layered Backgrounds
Whenever I feel a card is missing something, but my heart is happy with the actual design, I mount my card base, onto another base (that is of a contrasting color) to create layers and dimension. It sounds like a simple step, and one you could do without, but makes suuuuch a difference. I hope you'll try it sometime!
So there you have it, my top ten ways to add texture!
So there you have it, my top ten ways to add texture!

For this card, I used all of the above methods, but I still find that it is not overpowering, because the key to all of these for me, is to apply them in moderation.

Supplies used on this card are: PTI Harvest Gold Felt, PTI buttons in Plum Pudding, Lavender Moon, and Aqua Mist, cutout camera from a patterned paper, Tim Holtz Floral stencil, hello die from PTI's Super Succulents.

The next type of texture is the one that can be created with just simple stamping and paper layers.
This creates a look that is dynamic, without being 'textured' in the true sense of the word. They key to this is to use contrasting colors (light and dark) and layering stamped pieces over each other, whenever possible.
If you look at the example above, all of the various elements could have been stamped onto just a single paper background, which would not give the same textured appearance. Also, I could have used entirely light colors (such as the light blue and soft pink) or entirely dark colors (such as the amber and olive green) and I would have ended up with something that was a lot more one-dimensional than this appears.
Of course, my heart wouldn't be happy if it also wasn't finished with a bow and a flower, so that helps too, but really, even without the fancy top, this little tag has plenty of dimension without a ton of product.
Products used on this tag are Wplus9 Fresh Cut Wreaths, CTMH Little Dreamer stamp, PTI's ink in sweet blush, saffron spice, spring rain, twisted olive, and aqua mist.
Products used on this tag are Wplus9 Fresh Cut Wreaths, CTMH Little Dreamer stamp, PTI's ink in sweet blush, saffron spice, spring rain, twisted olive, and aqua mist.
Thanks for sticking with me through this long post, and I hope it answered some of your questions.
Should you find that you're craving more texture in your projects, I hope you'll give these tips a try!
Should you find that you're craving more texture in your projects, I hope you'll give these tips a try!
Until next time,
Ivana


Thank you dear Ivana~
ReplyDeleteI love to stop in and see what you've been creating : )
The texture hints are a great help and a wonderful reminder
too; as sometimes we just 'forget' what possibilities there are!
Blessings and hugs,
Karen
I couldn't agree more, Karen! I keep a handy list of techniques near my craft space, so when I feel like I am out of ideas, I always have something to turn to :) Thanks so much for visiting and for your kindness! Sending big hugs! xo
DeleteThese are great tips my dear friend! You're an amazing artist and these tips are like GOLD for us! Thank you for being so kind and share them with us! xoxo p.s your projects are stunning!
ReplyDeleteThank you so much, Aneta!!! Sending you big hugs!
Delete