~Pinwheels & Thank You's~
Back again today to share part 2 of my post from yesterday. These are the other two cards I whipped up with all the little bits and pieces I had stamped and pre-made.
I was so lucky to have a good friend share her stamp collection and die collection with me (some lovely Stampin Up products), so that I could test them out. I often see beautiful products in their catalogue - but I have a confession to make - I am not the most savvy sight-unseen shopper.
I tend to like to see and feel the items before I make a purchase...So it is really nice to have a chance to use some dies and stamps and test them out!
I have to say my new favorite is this adorable little mini pinwheel. It is unlike any of the other pinwheel dies out there, and it is a breeze to pull together. So here is my first card, featuring the adorable, little pinwheel that stole my heart :)
This card is a little different than my usual style (with a fold), as it is actually a flat card, with a pocket in the front (meant to hold that adorable little pinwheel, or whatever else that might come into mind).
For the background, I stamped a lace motif using some VersaMagic ink. For the bottom part, I did a technique similar to the hexagon quilt card from yesterday's post...I added stamped and cut hexagons to an embossed hexagon cardstock piece, and embellished it with liquid pearls, stamped miniature hearts, and buttons.
Over that, I layered a die-cut banner, with another smaller stamped banner for the sentiment.
Here is the little pinwheel card pulled out of it's pocket. I layered two pinwheels to create this little guy...A lilac and soft blue, held together with a teensy vintage button.
Here is what the card looks like without the pinwheel tucked inside...
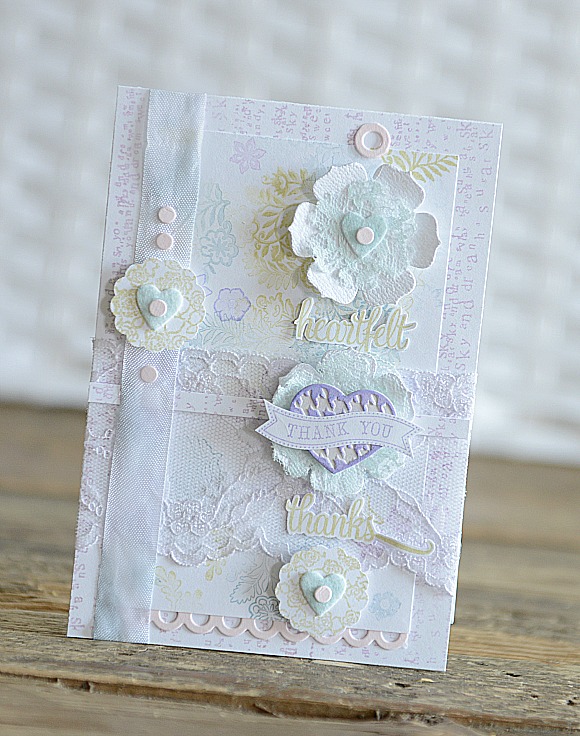
Next up, I tried a stamping technique I've been wanting to do some time now. A water-colored effect of sorts...By stamping images with a stamp that has already had most of the ink removed...What I mean by this is to stamp a freshly inked image onto a scrap paper, and then stamp the second and third time onto your final project, for that faded look. You can also achieve different looks by apply different amounts of pressure to the stamp to obtain either an outline image, or a solid image...
The leaf and flower paper is stamped with this technique and I adore how it turned out. I can't wait to try it with some bolder inks, as the look it creates is so soft and dreamy...And I think colors I normally wouldn't use, could look really pretty and muted with this technique.
It is so hard to photograph such soft colors, but this card is by far one of my faves of the set! I love how soft and delicate it is...And all the layers only help to add textured without taking away from the softness.
After I layered my stamped background onto another stamped piece of cardstock, I added a strip of lace to the lower portion of the card, followed by two cardstock/lace flowers I die-cut using this die. To the center flower, I added a die-cut/embossed heart with a little banner, and just above and below that, I added a stamped sentiment which I hand-cut.
On the left hand side, I adhered a piece of vintage trim, along with a die-cut paper and felt embellishment.

And lastly, I tucked in a teensy little dot border at the bottom for a splash of soft pink.
But, that's not all! I still have two more little things to show you, so I will be back tomorrow with more. I'll also be adding all of these items to my Etsy Shoppe as soon as I post tomorrow's creations. The special discount code for my Shoppe, which can be found inside the current issue of PaperHaus, is valid until the end of March, so be sure to check it out!
Thanks so much for stopping by!
*Ivana*


Какая нежность! очень нравятся работы и что интересно - я вчера тоже сделала открытку с маленькой вертушкой)http://feedproxy.google.com/~r/Hand_madeByTrizza/~3/LiQV3ngmXGo/2-scrap-card-for-baby-happy-owls.html
ReplyDelete