

Hello Friends!
Welcome back to another installment of Tutorial Tuesdays!

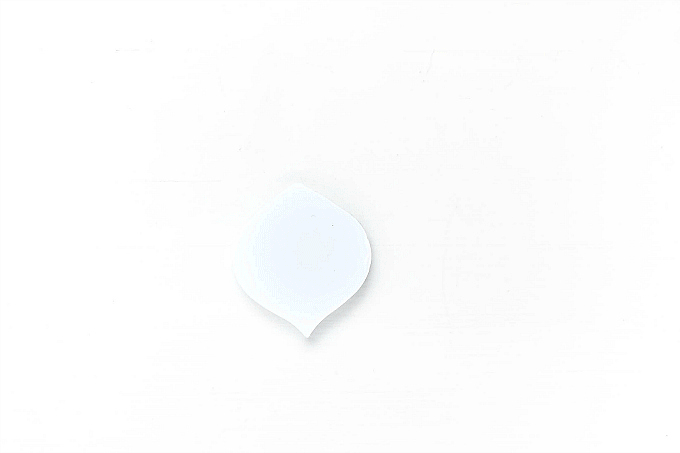
Do you love Nuvo drops as much as I do? Ever wondered if you can do more with this fab product? I've been experimenting lately and today I'm sharing a quick and easy tutorial on how to create glazed embellishments with this lovely product, for a touch of sparkly dazzle!
STEPS
1. Start with your embellishment base - preferably a thicker material that won't buckle, like foam, chipboard, or thick cardstock. I love using the leftovers from this sweet kit.
2. If your base is not already die-cut + sticky, add this adhesive sheet, and diecut with your choice of dies.
3. Peel the adhesive film, and dip your embellie into your favorite glitter. Feel free to make your own mix as I do.
4. To glaze the ornament, simply cover your entire surface area with Nuvo Jewel Drops - they dry clear and are ever-so-slightly-tinted.
5. Use a needle to even out the glaze, or pop any air bubbles.
5. Use a needle to even out the glaze, or pop any air bubbles.
6. Gently add rhinestones on top of the glaze (optional) and let dry.

____________________________________________________________________
TIP
Since Nuvo Drops are not intended for covering a large surface area, it takes a little longer to dispense the product, but this also means it's easier to control how much is applied. If you get impatient, simply remove the applicator tip with some pliers and use a popsicle stick or palette knife to apply.
____________________________________________________________________
Not only does this technique help keep all the glitter in place, but it acts as a beautiful mirror-like finish, with a lovely hue. Here I used Rose Water Jewel Drops. If you don't have this product on hand, you can try mixing your own! Simply add a drop of dye ink to your glazing medium (like Glossy Accents).

After making this sweet little ornament, I added some darling toppings to pull together a little tag.
I used PTI's Scene It Basic Backer die cut in Kraft cardstock, and a smaller, canvas scallop followed by a punched cardstock circle.

At the top, I added a wood button, and also a heat-embossed sentiment on some vellum.

I added some tinsel and greenery all around the tag for a bit of extra texture.

Thanks so much for visiting! Catch another Tutorial Tuesday next month :)
______________________________________________________________________
Glazing is really fun and easy, and a great way to get extra mileage out of your products. I hope you'll give it a try!
SUPPLIES
Glazing is really fun and easy, and a great way to get extra mileage out of your products. I hope you'll give it a try!
If you're not sure what #letsmakesomethinglovely is, check out the intro post here.
______________________________________________________________________
______________________________________________________________________
SUPPLIES
For your convenience, I've compiled a list featuring products used in the project(s) above. By using affiliate links when you shop, you will be helping to support this blog and exciting new content. Simply click below to go directly to the products, and in doing so, when you shop, I earn a small commission - at no extra cost to you! Yay to a double win!
Thank you so much for your support!
PIN IT!


How fun! This is pretty Ivana!
ReplyDeleteThank you so much!! :)
DeleteOh friend this is amazing!! Truly gorgeous; soo festive! The glitter shards and details are stunning~ TFS karen o
ReplyDeleteThanks so much, sweet friend!! Big hugs and Merry Christmas to you!
DeleteReally beautiful...where did you find the greenery and tinsel?
ReplyDeleteThank you so much! I found both at a Hobby Lobby, but they may even be available online on Amazon. I know that Michaels used to sell the silver tinsel bottle brush piping in the kids craft aisle, and Tim Holtz greenery tinsel in papercrafts. Hope that helps!
Delete