
Hi Friends!
Welcome back to Part Two of the fun and fabulous Wonder Stix introduction! If you're just joining me, swing over to Part One and learn all about the properties and various uses of this awesome color medium - it will help provide a background on why I love these crayons so much. If you're already caught up-to-date, feel free to read on, as I'm sharing a few techniques and tips that I've come across while putting these guys to the test.

Welcome back to Part Two of the fun and fabulous Wonder Stix introduction! If you're just joining me, swing over to Part One and learn all about the properties and various uses of this awesome color medium - it will help provide a background on why I love these crayons so much. If you're already caught up-to-date, feel free to read on, as I'm sharing a few techniques and tips that I've come across while putting these guys to the test.
TECHNIQUES
TRADITIONAL COLOR MEDIUM
Like most color mediums, Wonder Stix work super well with traditional coloring techniques! Here are just a few of my favorites.
Like most color mediums, Wonder Stix work super well with traditional coloring techniques! Here are just a few of my favorites.
Transfer Technique with Stamps
Color directly on stamps, spritz with water, and simply stamp onto your paper. This will
give off a very artsy, distressed look which I love. For best results, use with
watercolor paper or heavy-weight mixed media paper.
Transfer Technique with Embossing Folders
Apply Wonder Stix color onto the raised side of embossing folders, spritz with water and
run through your die-cutting machine for a distressed look. For best results, use with watercolor
paper or heavy-weight mixed media paper.
Smooshing Technique
Apply a generous
amount of Wonder Stix on your kraft mat, spritz with water and smoosh onto
watercolor paper to get a pretty background. For best results, use with
watercolor paper or heavy-weight mixed media paper.
WATER COLORING
Of course, since Wonder Stix are water-reactive, they work super well as a watercoloring medium of sorts!
Matte Watercolor
Apply a little bit of Wonder Stix color to your kraft mat, either right from the crayon or by using some shavings, then add a little water or dip in your water brush, and apply to stamped images, backgrounds, or accents, for incredibly matte, chalky hues! The hues are super blendable and soft, but they do not work like most watercolors. I simply refer to Wonder Stix as water-reactive, as opposed to a true watercolor. This medium will not replace your watercolors, but it will act a super fun expansion to your water coloring techniques.
DRAWING
Simple Drawing Techniques

Simple Drawing Techniques
Due to the smaller tip, these are a lot easier to draw with than the larger crayons on the market. Still, it's important to note, like all crayons and pastels, detailed drawings are a little more difficult to master. BUT, I personally can’t stop doodling little circular roses :) With so little skill required to make these – anyone can do it! Also, drawing allows for one other technique....
Heat-Embossing
Yep, you read that right! For some time now, I've been trying to put my finger on the consistency of these crayons, and I've noticed even though they're matte, they're not chalky like a lot of other watercolor crayons. They apply more on the sticky side (but not terribly so). I've been pondering if they would heat-emboss, and to my surprise, they do! Heat embossing with these crayons yields best results when drawing directly on paper, vellum, or heat-safe acetate. After drawing, I heat my image a little, to melt the crayon a bit more, and then swiftly apply embossing powder, and heat set again. If you look closely at the image of roses above, hopefully you will see a tad of sparkle. It's actually a lot more pronounced in real life. Impressively, the embossing powder sticks on quite well!
ALTERNATIVE COLOR APPLICATION
If you find drawing with pastels a little more challenging, why not try alternative ways to add color to your projects? The options below provide for detailed coloring, even if you don't consider yourself an artist.
If you find drawing with pastels a little more challenging, why not try alternative ways to add color to your projects? The options below provide for detailed coloring, even if you don't consider yourself an artist.
Stenciling

Pairing Wonder Stix with stencils is a great way to add detailed designs to your projects! Simply color in with
your favorite colors, peel back your
stencil, and stare in awe at the masterpiece you’ve created! You can easily color in all the way to the edge by pressing a little harder when coloring (you may encounter some 'crumbing', but it's easy to wipe off with a light brush before you remove your stencil). Or you could opt for a soft hand at coloring. You likely won't be able to reach all the way to the
edge of stenciled designs by using light strokes, but this is just as fun, as it leaves plenty of room to run your favorite accent
pen along the edges for a sharper look. Either way, Wonder Stix work best with larger stenciled designs, ones that comfortably fit
the crayon’s tip.
Die-cuts
Do you
have a shape you need to draw, but crayons don’t provide fine enough detail? I
say die-cut it! I’ve die-cut acetate, cardstock, vellum and lots of other
materials, and then used Wonder Stix to color things up. While your other color mediums (such as alochol markers, and ink) work well for this technique, none of these mediums work on ALL different types of paper and materials, like Wonder Stix!
Coloring Embossed
Paper

I love dry embossing paper, but sometimes find the look a little
plain. Sure, you can swipe a bit of ink or even larger crayons over the raised
surface, but it’s very difficult to selectively color in a detailed design. Colored pencils require too much pressure to apply, damaging the delicate embossed details. But with Wonder Stix, coloring dry embossed details is totally possible! The small tip of these crayons
makes it possible to just swipe the crayon across selective designs, and the creamy nature requires very little pressure. All you have to do is watch
like magic as the creamy color transfers perfectly onto the raised bits!
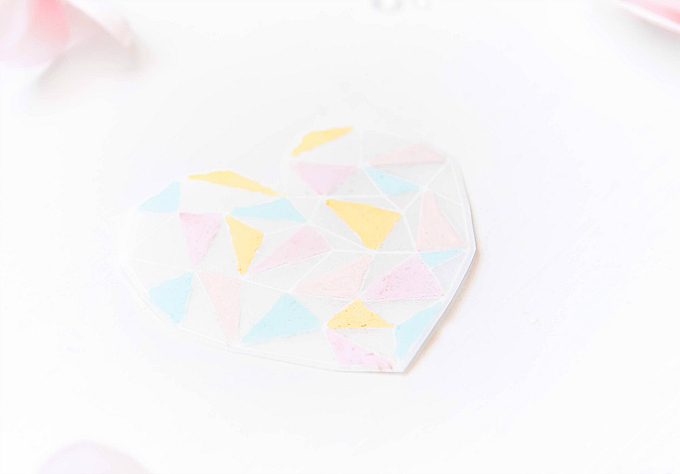
Coloring on Vellum

So here’s where my favorite technique comes in, and guys, just for this
reason alone, if you love vellum, these BELONG in you stash! I was over the moon to discover that
these pretty hues look amazing on vellum!
Back-side application yields super vibrant hues...As if they were colored on the right side. It’s crazy!! I even used a
very thick vellum to test things out, and the colors still showed up perfectly (see below). I compared
them side by side with my Prismacolor Premier pencils on vellum (which is what I used to use), and I have to
say, in comparison, Wonder Stix retain their vibrancy much, much better. They also retain their vibrancy much better than some super high quality artists' watercolor pastels. It has made my back-side coloring a dream! Also, best
part about using this back-side application approach? When working with a heat-embossed image, you don’t have to worry so much about staying
perfectly within the lines (which is a great technique when working with crayons of any sort), and using the wrong side on your final project ensures that no stray
crayon bits get anywhere on your project but where they're intended to be. Here is a quick peek at this heart's backside view.
Coloring Agent for
Various Mediums
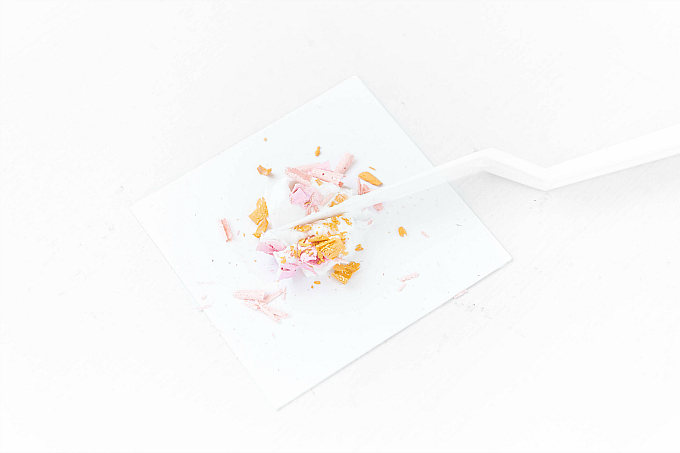
Aside from a
drawing medium, you can think of Wonder Stix as a coloring agent, sort of
like a pigment, that can be used to tint anything from embossing paste, to
paint, to Glossy Accents. I’ve personally tinted all three, and it works like a
charm! Simply apply some diluted Wonder Stix pigment (with a teeny bit of water) or shavings to your craft mat, then mix with
paint, embossing paste, or Glossy Accents, and apply to your project. Here, I've used a bit of water-diluted Wonder Stix to tint some embossing paste, which I then applied using a stencil.

I hope this breakdown helps offer a little look into the wonderful, colorful world of possibilities with Wonder Stix! Whatever technique you love or lean towards, chances are, you can incorporate this affordable, all-in-one color medium.
Tomorrow, I'll be sharing my first card with this fun color medium, incorporating a few of these fun techniques. I hope you'll join me :)
See you back here tomorrow!
SUPPLIES
This list may feature some affiliate links to products used in the project(s) above. Should you use these links before shopping, it will never add any extra cost to your purchase, but it will go a long way in helping support this blog and exciting new content.
Affiliate link or not, I only share products I love, and think you will too :)
Biggest thank you's for visiting and for your support! It really means so much.


Hi Ivana, Thank you for this super-informative post~ I'm sooo intrigued! I am a cautious buyer; but even more so I'm a bit of a 'afraidy-cat'! in trying new products~ It's just the truth : ) But the versatility is amazing and the cost so affordable, I can't go wrong! I'll let you know when I receive them and give 'em a go~ Hugs, karen o
ReplyDeleteOh I totally understand, and I feel so much the same way. If not only for the fact that after a while, all that product gets overwhelming! And expensive! :) I'm just so impressed with these, especially at this price point. They may not be professional artist supplies, but their versatility is unbeatable! Definitely fun to play with.. I really hope you love them! I'll be sharing lots more info on these, so I hope it helps! And please feel free to reach out ANYTIME if you have a question, get stuck, or anything like that. I'm still experimenting and learning as I go! :)
DeleteAnother great post, my friend! :)
ReplyDeleteThanks so much, sweet friend! Glad it was helpful :) xoxo
DeleteOh my goodness, this series is AWESOME.
ReplyDeleteAw so glad you like it, friend! Biggest of hugs to you :)
DeleteFabulous post, very informative! Now I just need to find them ;-)
ReplyDeleteI would be happy to help, friend. Feel free to dm me or send me a note through the contact page and we can figure something out! xo
DeleteOK--I give in--haha! Thanks for all the info, my friend! Next time I'm at Michael's I'll be using my coupon to get these!
ReplyDelete