

Hello Friends!
I mentioned I'd be back with the beautiful Altenew alphas.
This time around with a sparkly, glittery take, that features a negative inlay and a fabulous way to stretch these fantastic dies!
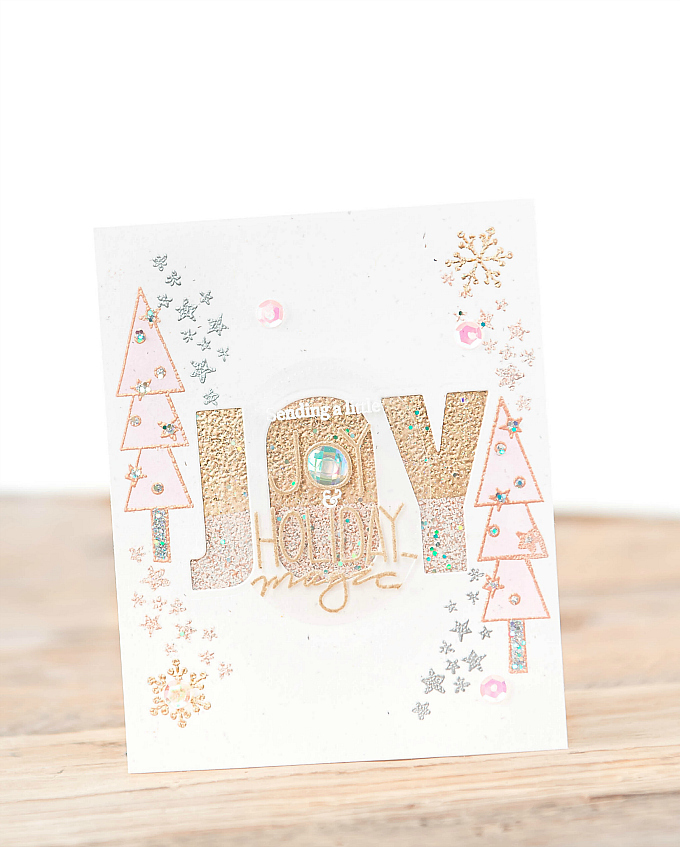
To start my card, I used the pretty Caps Bold alpha dies to create a negative cut-out of my focal point. I've been loving the word 'joy' and I've chosen it as my go-to for this Season's cards. You'll see a few more cards with it yet to come.
______________________________________________________________________
TIP: FAUX INLAY LETTERING
To accentuate the negative die-cuts, and create the look of inlay lettering, rather than actually embossing each letter, you can use a cardstock base covered with a sticky double-sided adhesive sheet. For a two-tone look, use a piece of cardstock to cover the lower portion of the now-sticky paper, as you apply the embossing powder. Then simply add a mixture of gold, pink, white and glittered embossing powders to create a sparkly base. Once the top is heat-embossed, add embossing powder to the bottom half, using a different mix of embossing powders.
______________________________________________________________________
This sparkle is sooo pretty in person! And I love that the glitter stays in place. No one likes a messy card that sheds all over :)

To accent the central word, I used the pretty Stampendous Rose Gold embossing enamel to stamp sweet trees from a favorite Christmas stamp set in my stash (I think it's by Fancy Pants?), but any tree would work! I used the stars and snowflakes from the set as well, embossed in silver and leftover pink and gold custom-mixes.
I used a glue pen to fill in the tree's trunks, and ornaments, and added some Silver Halo glitter (my fave!). I also colored the trees with a soft pink Copic marker, and then stamped a sentiment, embossed in kraft and white, onto some heat-safe clear cardstock. I absolutely love how this card looks in person!
______________________________________________________________________
If you like this technique, and want to give it a try, I say go for it!! And then share it with us at
If you're not sure what #letsmakesomethinglovely is, you can check out the intro post here.
______________________________________________________________________
______________________________________________________________________

Happy crafting and thank you so much for visiting!
SUPPLIES
For your convenience, I've compiled a list featuring products used in the project(s) above. By using affiliate links when you shop, you will be helping to support this blog and exciting new content. Simply click below to go directly to the products, and in doing so, when you shop, I earn a small comission - at no extra cost to you! Yay to a double win!
Thank you so much for your support!


This is lovely Ivana! The sparkling metallics are extra fancy and I like the layout of your design. Those cascading stars and snowflakes create wonderful movement!
ReplyDeleteThank you so much, Lisa! I have THE hardest time creating movement on cards - it's so heartwarming to know you like the stars and flakes! Thanks for your sweet visits, dear friend! xo
Delete